Introduction
If you've ever built web applications that involve forms , real-time updates , or complex data interactions, you know the struggle can be real. Traditionally, these features often required setting up separate API endpoints and managing intricate client-side state. Server Actions come to the rescue! They provide a smooth solution, allowing you to execute server-side logic directly from your React components, just like calling a regular function.
What are Server Actions?
Server Actions provide a way to associate server-side functions with your React components. Think of them as directly callable API routes that live within your frontend code. This tight integration simplifies data management and leads to more responsive, snappier applications.
Let's explore how Server Actions can supercharge your development workflow and make your apps feel more responsive and interactive.
Setup
Prerequisites: Node.js v18 or Bun
1. Create a New Next.js App
Learn more about options at NextJs
npx create-next-app@latest server-actions
Select the recommend - App router, tailwindcss
2. Styling
We use tailwindcss it's already setup if you select yes while creating NextJs application.
We also use Shadcn ui along with tailwindcss. Shadcn is a collection of re-usable components.
npx shadcn-ui@latest init
These are the components we well be using in this demo.
npx shadcn-ui@latest add avatar
npx shadcn-ui@latest add button
npx shadcn-ui@latest add card
npx shadcn-ui@latest add dialog
npx shadcn-ui@latest add input
npx shadcn-ui@latest add label
npx shadcn-ui@latest add switch
3. Database, Storage, and Authentication
Supabase:
For the database and storage, we will use Supabase . It is an open source Firebase alternative.
npm install @supabase/supabase-js
- Create a account on supabase it is free.
- Create a new Project.
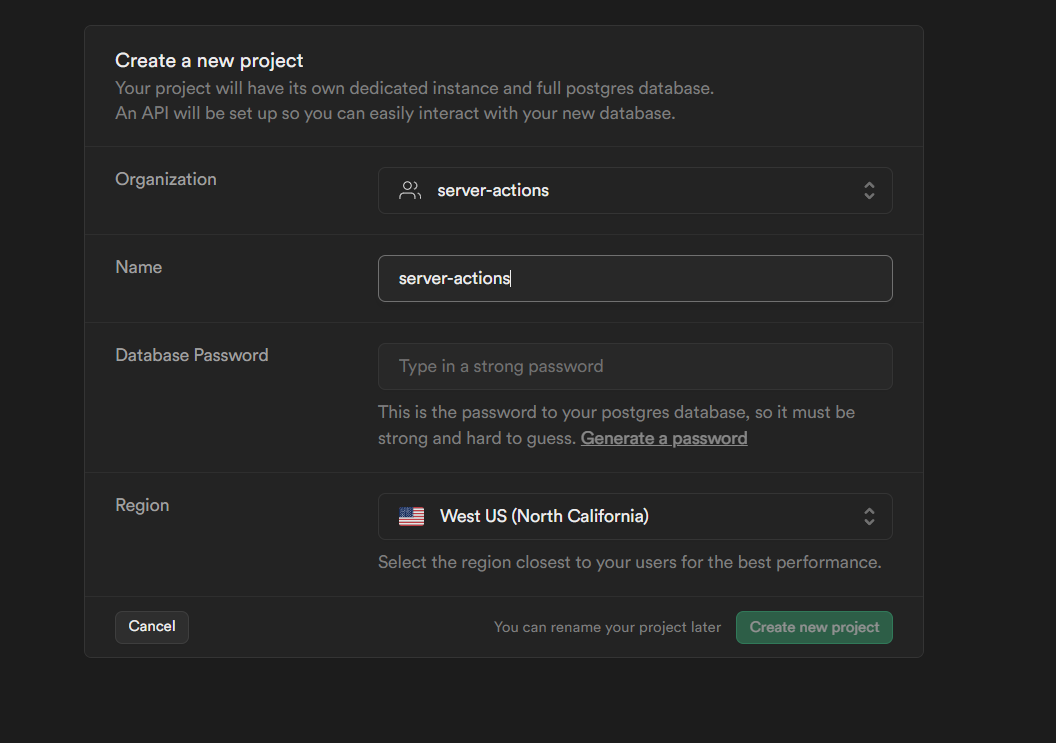
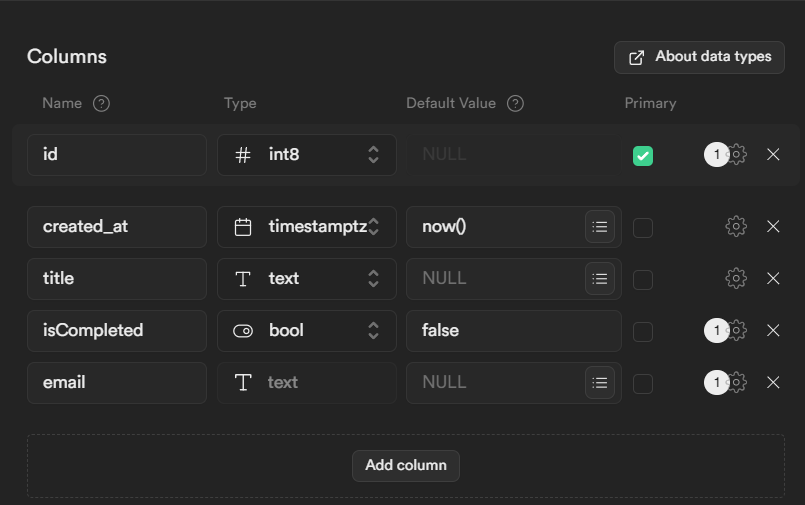
- Create a new table. You can use the table editor or sql editor.
- Make sure to add api keys from supabase to .env.local
# .env.local

SUPABASE_URL=_Project_URL
SUPABASE_SERVICE_ROLE_KEY=_SUPABASE_SERVICE_ROLE_KEY
Auth.js:
For authentication we will use AuthJs . It is updated version of NextAuth .
npm install next-auth@beta @auth/supabase-adapter
Follow this guide to setup supabase adapter for auth.
Make sure to Expose the NextAuth schema in Supabase Api settings
Create file name /lib/supabase/private.ts
In this file we will be creating a supabase client and call that clients wherever we need.
// /lib/supabase/private.ts

import { createClient } from '@supabase/supabase-js'

if (!process.env.SUPABASE_URL || !process.env.SUPABASE_SERVICE_ROLE_KEY) {
  throw new Error('Missing env vars SUPABASE_URL or SUPABASE_SERVICE_ROLE_KEY')
}

const privateClient = createClient(
  process.env.SUPABASE_URL,
  process.env.SUPABASE_SERVICE_ROLE_KEY,
)

export const nextAuthClient = createClient(
  process.env.SUPABASE_URL,
  process.env.SUPABASE_SERVICE_ROLE_KEY,
  {
    db: { schema: 'next_auth' },
  },
)

export default privateClient
Start with Authentication
1.Setup OAuth app
Github
Follow this github guide for creating Oauth.
NOTE
Make sure to add http://localhost:3000/api/auth/callback/github as callback
url in github Oauth application.
After creating Oauth in github copy API keys from github as it required by AuthJs.
Along this api key you have to get AUTH_SECRET, which you can generate from this:
npx auth secret
Or
Visit the Vercel App to generate secret
Add all the key to you .env.local.
# .env.local

AUTH_SECRET=

AUTH_GITHUB_ID=
AUTH_GITHUB_SECRET=
NOTE
Make sure to add http://localhost:3000/api/auth/callback/google as callback
url in Oauth application.
# .env.local

AUTH_GOOGLE_ID=
AUTH_GOOGLE_SECRET=
2.Auth.ts
Crate auth.ts in route of your project.
// app/auth.ts

import NextAuth from 'next-auth'
import { SupabaseAdapter } from '@auth/supabase-adapter'
import GitHub from 'next-auth/providers/github'
import Google from 'next-auth/providers/google'
import type { NextAuthConfig } from 'next-auth'

export const config = {
  providers: [GitHub, Google],
  adapter: SupabaseAdapter({
    url: process.env.SUPABASE_URL as string,
    secret: process.env.SUPABASE_SERVICE_ROLE_KEY as string,
  }),
} satisfies NextAuthConfig

export const { handlers, auth } = NextAuth(config)
Here we are using supabase adapter and our choice of providers for auth. You can add more providers from AuthJs Providers .
If you adding more provider make sure to add Oauth API keys in the .env.
3.Adding API route
create file in /api/auth/[...nextauth]/route.ts
// /api/auth/[...nextauth]/route.ts

import { handlers } from '@/app/auth' // check your auth.ts route
export const { GET, POST } = handlers
Crate a file name as middleware.ts
Make sure to add this as same level as App or inside src if you use src as your root.
// middleware.ts

export { auth as middleware } from '@/app/auth'

export const config = {
  matcher: [
    /*
     * Match all request paths except for the ones starting with:
     * - _next/static (static files)
     * - _next/image (image optimization files)
     * - favicon.ico (favicon file)
     * Feel free to modify this pattern to include more paths.
     */
    '/((?!_next/static|_next/image|favicon.ico|.*\\.(?:svg|png|jpg|jpeg|gif|webp)$).*)',
  ],
}
4.Create Sign In And Sign Out
Create signIn and signOut button
// components/auth-components.tsx
'use client';

import { signIn, signOut } from 'next-auth/react';
import { Button } from './ui/button';

export function SignIn({ provider, ...props }: { provider?: string } & React.ComponentPropsWithRef<typeof Button>) {
  return (
      <Button {...props}>Sign In</Button>
    </form>
  );
}

export function SignOut(props: React.ComponentPropsWithRef<typeof Button>) {
  return (
    <Button variant='destructive' onClick={() => signOut()} className='w-full' {...props}>
      Sign Out
    </Button>
  );
}
5.Create Navbar
Create navbar where we will show Sign In button.
Inside components create file Navbar.tsx.
// Navbar.tsx

import Link from 'next/link'
import { Button } from '@/components/ui/button'
import { SignIn, SignOut } from './auth-components'
import { auth } from '@/app/auth'
import { Avatar, AvatarFallback, AvatarImage } from '@/components/ui/avatar'

export default async function Navbar() {
  const session = await auth()
  return (
    <nav className='fixed inset-x-0 top-0 z-50 bg-white shadow-sm dark:bg-gray-950/90'>
      <div className='mx-auto w-full max-w-7xl px-4'>
        <div className='flex h-14 items-center justify-between'>
          <Link className='flex items-center' href='/'>
            <Button size='sm'>
              <span>/</span>
            </Button>
          </Link>
          <nav className='flex items-center gap-2 sm:gap-4'>
            <Link href='/todos'>
              <Button size='sm'>Todos</Button>
            </Link>
            {!session?.user ? (
              <SignIn size='sm' />
            ) : (
              <>
                <Link href='/profile'>
                  <Button size='sm'>Profile</Button>
                </Link>
                <SignOut size='sm' variant='destructive' />
                <Avatar className='h-10 w-10 rounded-full border border-red-500'>
                  {session.user.image && (
                    <AvatarImage
                      src={
                        session.user.image ??
                        'https://source.boringavatars.com/beam/120'
                      }
                      alt={session.user.name ?? ''}
                    />
                  )}
                  <AvatarFallback>{session.user.email}</AvatarFallback>
                </Avatar>
              </>
            )}
          </nav>
        </div>
      </div>
    </nav>
  )
}
Now navbar is by default server component, so we can call supabase auth and check if user is authenticated.
I am hopping that if you learning about server actions, you already know the server and client components. If not then it's good idea to just learn about them from NextJs official tutorial Learn NextJS .
With session we will conditionally render different button.
You can check that now our authentication system is working, we are able to login with github as well google.
NOTE
In development if your Oauth is not redirect back to application add
AUTH_REDIRECT_PROXY_URL in .env.local. Only add this in development.
You can check that our user are now stored in supabase as well.
Building a Todo App with Server Actions
Now our first part is done, we will working on todo application.
We will learn how to use server actions in CRUD (Create, Read, Update, Delete).
1.Todo Homepage
Let's create a new page as 'todos/page.tsx'
// app/todos/page.tsx

import AddTodo from './AddForm'
import TodoList from './TodoList'
import { auth } from '@/app/auth'
import { SignIn } from '@/components/auth-components'

export default async function Todo() {
  const session = await auth()
  if (!session?.user)
    return (
      <div className='mx-auto flex min-h-screen w-11/12 flex-col items-center justify-center gap-10'>
        <h1 className='text-3xl'>You must login to perform this action.</h1>
        <SignIn />
      </div>
    )

  return (
    <div className='mx-auto flex min-h-screen w-11/12 flex-col items-center justify-center gap-10'>
      <AddTodo user={session?.user} />
      <TodoList user={session?.user} />
    </div>
  )
}
As this route is protected, we will check if user is authenticated or not with auth()
2.Add Todo Form
Create new file name AddForm.tsx.
// todos/AddForm.tsx

import { SubmitButton } from '@/components/submit-button';
import { Input } from '@/components/ui/input';
import { Label } from '@/components/ui/label';
import { addTodo } from '@/app/actions';
import { User } from 'next-auth';

export default function AddTodo({ user }: { user: User }) {

return (
    <div className='flex items-center justify-center'>
      <div className='mx-auto grid w-[350px] gap-6'>
        <div className='grid gap-2 text-center'>
          <h1 className='text-3xl font-bold'>Add Todo</h1>
        </div>
        <form>
            <div className='grid gap-2'>
              <Label htmlFor='title'>Todo</Label>
              <Input id='title' type='text' placeholder='Write your task here' name='title' required />
            </div>
            <SubmitButton name='Add Todo' variant='outline' className='' />
          </div>
        </form>
      </div>
    </div>
  );
}
This is simple form with shadcn Components.
We also using one more hook from react-dom named as useFormStatus.
It helps us to show pending state such as change the button text to Submitting... or disabled the button so user do not resubmit the action.
You can learn more about that hook in React docs .
Create new client component.
// components/submit-button.tsx
'use client'

import { useFormStatus } from 'react-dom'
import { Button } from '@/components/ui/button'

export function SubmitButton({
  name,
  className,
  variant,
}: {
  name: string
  className: string
  variant:
    | 'link'
    | 'outline'
    | 'default'
    | 'destructive'
    | 'secondary'
    | 'ghost'
    | null
    | undefined
}) {
  const { pending } = useFormStatus()

  return (
    <Button
      type='submit'
      disabled={pending}
      className={className}
      variant={variant}
    >
      {pending ? 'Submitting...' : name}
    </Button>
  )
}
NOTE
If you are using useFormStatus make sure to use it as a child component of
parents form. In our case we are using it in AddForm.tsx. In react19 you can
also use useActionState for pending state.
3.Create actions.ts
Crate a file name actions.ts
At start of file write 'use server'.
// app/actions.ts

'use server'
import supabase from '@/lib/supabase/private'

export async function addTodo(
  email: string,
  prevState: any,
  formData: FormData,
) {
  try {
    const { data, error } = await supabase.from('todos').upsert({
      title: formData.get('title'),
      email: email,
    })

    if (error) {
      console.log('Error', error)
      return {
        type: 'error',
        message: 'Database Error: Failed to add todo.',
      }
    }
    revalidatePath('/todos')
    return {
      type: 'success',
      message: `${validatedFields.data.title} added successfully.`,
      resetKey: Date.now().toString(),
    }
  } catch (error: any) {
    console.log('Error', error.message)
    return {
      type: 'error',
      message: 'Database Error: Failed to add todo.',
    }
  }
}
This is the server action name addTodo.
Here we will get the formData and email of current user.
With the help of supabase client we will update the database.
Depending on the error or success we will send the message back to our component.
4.Update the AddForm.tsx
We will add this action to our form with the help of useFormState. It is new hook in react-dom .
As per react
useFormStateis a Hook that allows you to update state based on the result of a form action.
CAUTION
As of now React19 is changing this hook. If you are interested check this
github discussion . If you are
using React19 you can use useActionState instead of useFormState.
This means that we will get state with out server action such as error message or success message from server action.
We will show that message with react-hot-toast .
Install the react hot toast
npm install react-hot-toast
In layout.tsx
// layout.tsx

import type { Metadata } from 'next'
import { Inter } from 'next/font/google'
import './globals.css'
import { Toaster } from 'react-hot-toast'
import Navbar from '@/components/navbar/navbar'

const inter = Inter({ subsets: ['latin'] })

export const metadata: Metadata = {
  title: 'Server Actions by patelvivek.dev',
  description: 'Learn server actions with patelvivek.dev',
}

export default function RootLayout({
  children,
}: Readonly<{
  children: React.ReactNode
}>) {
  return (
    <html lang='en'>
      <body className={`bg-zinc-500 ${inter.className}`}>
        <Navbar />
        {children}
        <Toaster position='bottom-left' />
      </body>
    </html>
  )
}
Updated AddFrom.tsx
// todos/AddForm.tsx
'use client'
import { toast } from 'react-hot-toast'
import { useEffect } from 'react'
import { useFormState } from 'react-dom'

import { SubmitButton } from '@/components/submit-button'
import { Input } from '@/components/ui/input'
import { Label } from '@/components/ui/label'
import { addTodo } from '@/app/actions'
import { User } from 'next-auth'

const initialState = {
  message: '',
  errors: null,
}

export default function AddTodo({ user }: { user: User }) {
  const addTodoWithEmail = addTodo.bind(null, user?.email as string)
  // Here we are bind user email with action. We can get that email in the server action as a argument.

  const [state, formAction] = useFormState<any>(
    addTodoWithEmail as any,
    initialState,
  )

  useEffect(() => {
    if (state.type === 'success') {
      toast.success(state.message)
    }
    if (state.type === 'redirect') {
      toast.success(state.message)
    }
  }, [state])

  return (
    <div className='flex items-center justify-center'>
      <div className='mx-auto grid w-[350px] gap-6'>
        <div className='grid gap-2 text-center'>
          <h1 className='text-3xl font-bold'>Add Todo</h1>
        </div>
        <form action={formAction} key={state?.resetKey}>
          <div className='grid gap-4'>
            {state?.type === 'error' && (
              <p className='bg-green-951 my-4 mb-2 rounded-md border-2 border-gray-300 p-2 text-lg text-red-600'>
                {state.message}
              </p>
            )}
            <div className='grid gap-2'>
              <Label htmlFor='title'>Todo</Label>
              <Input
                id='title'
                type='text'
                placeholder='Write your task here'
                name='title'
                required
              />
              {state?.errors?.title && (
                <span id='title-error' className='text-sm text-red-600'>
                  {state.errors.title.join(',')}
                </span>
              )}
            </div>
            <SubmitButton name='Add Todo' variant='outline' className='' />
          </div>
        </form>
      </div>
    </div>
  )
}
5.Add validation
Let's add validation in our form.
We will using zod with TypeScript.
Update action.ts
import { z } from 'zod'

// =============================== addTodo ===============================
const addTodoSchema = z.object({
  title: z.string().min(3, { message: 'Must be 3 or more characters long' }),
})

export async function addTodo(
  email: string,
  prevState: any,
  formData: FormData,
) {
  const validatedFields = addTodoSchema.safeParse({
    title: formData.get('title'),
  })

  // Return early if the form data is invalid
  if (!validatedFields.success) {
    return {
      type: 'error',
      errors: validatedFields.error.flatten().fieldErrors,
      message: 'Missing Fields. Failed to add todo.',
    }
  }

  // if not email user is not authenticated
  if (!email) {
    return {
      type: 'redirect',
      message: 'Please Login again!.',
    }
  }

  try {
    const { data, error } = await supabase.from('todos').upsert({
      title: validatedFields.data.title,
      email: email,
    })

    if (error) {
      console.log('Error', error)
      return {
        type: 'error',
        message: 'Database Error: Failed to add todo.',
      }
    }
    revalidatePath('/todos')
    return {
      type: 'success',
      message: `${validatedFields.data.title} added successfully.`,
      resetKey: Date.now().toString(),
    }
  } catch (error: any) {
    console.log('Error', error.message)
    return {
      type: 'error',
      message: 'Database Error: Failed to add todo.',
    }
  }
}
After creating schema we will use safeParse.
This method returns an object containing either the successfully parsed data or a ZodError instance containing detailed information about the validation problems.
If we get success is false, we will send errors back to component, where we will show the error to user.
6.revalidatePath
If you see the above server actions, we used the revalidatePath .
By default next caches every routes, so when we add the todo we want to show to added todo back to the user.
That means we have to delete the old cache and update the ui.
This is what revalidatePath does for us.
NOTE
In current version of NextJs 14, next js caches everything by default, but in future version it will be changed. Learn more about caching in NextJS .
7.TodoList
now we will show the list of todos with some actions button.
db.ts
// app/db.ts

import supabase from '@/lib/supabase/private'
import { User } from 'next-auth'

export async function getTodos(user: User) {
  let { data: todos, error } = await supabase
    .from('todos')
    .select('*')

    // Filters
    .eq('email', user.email)
  return todos
}
This is the function for getting all the todo from database for current user.
TodoList.tsx
// TodoList.tsx

import { getTodos } from '@/app/db'
import {
  Card,
  CardDescription,
  CardFooter,
  CardHeader,
  CardTitle,
} from '@/components/ui/card'
import EditForm from './EditForm'
import DeleteForm from './DeleteForm'
import ChangeStatus from './ChangeStatus'
import { User } from 'next-auth'

export default async function TodoList({ user }: { user: User }) {
  let todos = await getTodos(user)

  // sort todos with id
  if (todos != null) {
    todos = todos.sort((a, b) => a.id - b.id)
  }

  if (todos?.length === 0) {
    return <h1>No todos yet! Please add with above form.</h1>
  }

  return (
    <div className='flex flex-row flex-wrap gap-4'>
      {todos?.map((todo) => (
        <Card key={todo.id}>
          <CardHeader>
            <CardTitle>{todo.title}</CardTitle>
            <CardDescription>
              Status: {todo.isCompleted ? ' Completed' : ' Not Completed'}
            </CardDescription>
          </CardHeader>
          <CardFooter>
            <EditForm todo={todo} />
            <ChangeStatus todo={todo} />
            <DeleteForm todo={todo} />
          </CardFooter>
        </Card>
      ))}
    </div>
  )
}
We will fetch all the todo and show the every todo in card.
8.EditTodo and DeleteTodo
Using same concept from AddForm, we will create EditForm and DeleteForm.
EditForm
// EditForm.tsx

'use client'
import { toast } from 'react-hot-toast'
import { useEffect, useState } from 'react'
import { useFormState } from 'react-dom'

import { SubmitButton } from '@/components/submit-button'
import { Input } from '@/components/ui/input'
import { Label } from '@/components/ui/label'
import { Button } from '@/components/ui/button'
import { Switch } from '@/components/ui/switch'
import {
  Dialog,
  DialogContent,
  DialogDescription,
  DialogHeader,
  DialogTitle,
  DialogTrigger,
  DialogFooter,
} from '@/components/ui/dialog'

import { editTodo } from '@/app/actions'

const initialState = {
  message: '',
  errors: null,
}

export default function EditForm({ todo }: { todo: any }) {
  const [open, setOpen] = useState(false)
  const id: number = todo?.id
  const editTodoWithId = editTodo.bind(null, id)
  const [state, formAction] = useFormState<any>(
    editTodoWithId as any,
    initialState,
  )

  useEffect(() => {
    if (state.type === 'success') {
      setOpen(false)
      toast.success(state.message)
    }
  }, [state])

  return (
    <Dialog open={open} onOpenChange={setOpen}>
      <DialogTrigger asChild>
        <Button>Edit</Button>
      </DialogTrigger>
      <DialogContent className='sm:max-w-[425px]'>
        <DialogHeader>
          <DialogTitle>Edit Todo</DialogTitle>
          <DialogDescription>
            Make changes to your todo here. Click save when you are done.
          </DialogDescription>
        </DialogHeader>
        <form action={formAction} key={state?.resetKey}>
          <div className='grid gap-4 py-4'>
            {state?.type === 'error' && (
              <p className='bg-green-951 my-4 mb-2 rounded-md border-2 border-gray-300 p-2 text-lg text-red-600'>
                {state.message}
              </p>
            )}
            <div className='grid gap-2'>
              <Label htmlFor='title'>Todo</Label>
              <Input
                id='title'
                defaultValue={todo.title}
                type='text'
                placeholder='Write your task here'
                name='title'
                required
              />
              {state?.errors?.title && (
                <span id='title-error' className='text-sm text-red-600'>
                  {state.errors.title.join(',')}
                </span>
              )}
            </div>
            <div className='flex items-center space-x-2'>
              <Label htmlFor='isCompleted'>Statues</Label>
              <Switch
                id='isCompleted'
                name='isCompleted'
                defaultChecked={todo.isCompleted}
              />
            </div>
          </div>
          <DialogFooter>
            <SubmitButton name='Save changes' variant='default' className='' />
          </DialogFooter>
        </form>
      </DialogContent>
    </Dialog>
  )
}
DeleteForm
// DeleteForm.tsx

'use client'
import { toast } from 'react-hot-toast'
import { useEffect } from 'react'
import { useFormState } from 'react-dom'

import { SubmitButton } from '@/components/submit-button'
import { deleteTodo } from '@/app/actions'

const initialState = {
  message: '',
  errors: null,
}

export default function DeleteForm({ todo }: { todo: any }) {
  let deleteTodoWithId = deleteTodo.bind(null, todo.id)
  const [state, formAction] = useFormState<any>(
    deleteTodoWithId as any,
    initialState,
  )

  useEffect(() => {
    if (state.type === 'success') {
      toast.success(state.message)
    }

    if (state.type === 'error') {
      toast.error(state.message)
    }
  }, [state])

  return (
    <form action={formAction}>
      <SubmitButton name='Delete' variant='destructive' className='ml-2' />
    </form>
  )
}
Actions
// actions.ts

// =============================== editTodo ===============================
const editTodoSchema = z.object({
  title: z.string().min(3, { message: 'Must be 3 or more characters long' }),
})

export async function editTodo(id: number, prevState: any, formData: FormData) {
  const isCompleted = formData.get('isCompleted')
  const validatedFields = editTodoSchema.safeParse({
    title: formData.get('title'),
  })

  let status = false
  if (isCompleted === 'on') {
    status = true
  }

  // Return early if the form data is invalid
  if (!validatedFields.success) {
    return {
      type: 'error',
      errors: validatedFields.error.flatten().fieldErrors,
      message: 'Missing Fields. Failed to edit todo.',
    }
  }

  try {
    const { data, error } = await supabase
      .from('todos')
      .update({ title: validatedFields.data.title, isCompleted: status })
      .eq('id', id)
      .select()

    if (error) {
      console.log('Error', error)
      return {
        type: 'error',
        message: 'Database Error: Failed to edit todo.',
      }
    }
    revalidatePath('/todos')
    return {
      type: 'success',
      message: `${validatedFields.data.title} updated successfully.`,
      resetKey: Date.now().toString(),
    }
  } catch (error: any) {
    console.log('Error', error.message)
    return {
      type: 'error',
      message: 'Database Error: Failed to edit todo.',
    }
  }
}

// =============================== deleteTodo ===============================

export async function deleteTodo(id: number) {
  try {
    const { error } = await supabase.from('todos').delete().eq('id', id)

    if (error) {
      console.log('Error', error)
      return {
        type: 'error',
        message: 'Database Error: Failed to delete todo.',
      }
    }
    revalidatePath('/todos')
    return {
      type: 'success',
      message: `Todo deleted successfully.`,
      resetKey: Date.now().toString(),
    }
  } catch (error: any) {
    console.log('Error', error.message)
    return {
      type: 'error',
      message: 'Database Error: Failed to delete todo.',
    }
  }
}
File Upload with Server Actions
To demonstrate how we can Upload file with server actions, we will change the user avatar.
By default OAuth will save the image url in users.image.
For this we will using supabase Storage for saving user avatar, get the url and store url back to users.image
1.Create a profile page.
// app/profile/page.tsx

import { auth } from '@/app/auth'
import { SignIn, SignOut } from '@/components/auth-components'
import ChangeAvatarForm from './ChangeAvatarForm'

export default async function PrivatePage() {
  const session = await auth()
  if (!session?.user)
    return (
      <div className='mx-auto flex min-h-screen w-4/5 flex-col items-center justify-center gap-10'>
        <h1 className='text-3xl'>You need to login to perfom this action.</h1>
        <SignIn />
      </div>
    )

  return (
    <div className='mt-20 flex min-h-screen flex-col items-center justify-center'>
      <p>Hello {session.user.name}</p>
      <SignOut className='' />

      <ChangeAvatarForm user={session?.user} />
    </div>
  )
}
2.Create A Change Avatar Form
// profile/ChangeAvatarForm.tsx

import { auth } from '@/app/auth'
import { SignIn, SignOut } from '@/components/auth-components'
import Image from 'next/image'
import ChangeAvatarForm from './ChangeAvatarForm'

export default async function PrivatePage() {
  const session = await auth()
  if (!session?.user)
    return (
      <div className='mx-auto flex min-h-screen w-4/5 flex-col items-center justify-center gap-10'>
        <h1 className='text-3xl'>You need to login to perform this action.</h1>
        <SignIn />
      </div>
    )

  return (
    <div className='mt-20 flex min-h-screen flex-col items-center justify-center space-y-5'>
      <p>Hello {session.user.name}</p>
      <div className='space-y-5'>
        <Image
          src={session.user.image!}
          alt={session.user.name!}
          width={100}
          height={100}
        />
        <SignOut />
      </div>

      <ChangeAvatarForm user={session?.user} />
    </div>
  )
}
This is same as AddForm, we will change the input type to file.
3.Create action
// actions.ts

// =============================== Change Avatar ===============================
export async function changeAvatar(
  email: string,
  prevState: any,
  formData: FormData,
) {
  const avatar = formData.get('avatar') as File

  if (!avatar) {
    return {
      type: 'error',
      message: 'Please select an avatar',
    }
  }

  // Only images are allowed
  if (!avatar.type.includes('image')) {
    return {
      type: 'error',
      message: 'Only images are allowed',
    }
  }

  // make sure file is less than 2MB
  if (avatar.size > 2 * 1024 * 1024) {
    return {
      type: 'error',
      message: 'File size must be less than 2MB',
    }
  }

  try {
    const { data, error } = await supabase.storage
      .from('profile')
      .upload(`public/${email}/${avatar.name}`, avatar, {
        upsert: true,
      })
    if (error) {
      console.log('Error', error.message)
      return {
        type: 'error',
        message: `${error.message}`,
      }
    }
    if (data.path) {
      const { data: avatar } = supabase.storage
        .from('profile')
        .getPublicUrl(data.path)

      // change the url in User table in next-auth schema
      const { error: userDataError } = await nextAuthClient
        .from('users')
        .update({ image: avatar.publicUrl })
        .eq('email', email)

      if (userDataError) {
        console.log('Error', userDataError)
        return {
          type: 'error',
          message: `${userDataError.message}`,
        }
      }

      revalidatePath('/')
      revalidatePath('/profile')
      return {
        type: 'success',
        message: 'Avatar changed!',
        resetKey: Date.now().toString(),
      }
    }
  } catch (error: any) {
    console.log('error', error)
    return {
      type: 'error',
      message: 'Database Error: Failed to change avatar.',
    }
  }
}
We validate the input such as only images are allowed and max size is 2mb.
In this action, we will upload the file to the supabase storage and get back the url.
Next we update the users table from next-auth schema.
After update we revalidate the cache
revalidatePath('/')
revalidatePath('/profile')
Because we have image in two places we have to revalidate two path.
Conclusion
React 19 Server Actions offer a powerful and elegant way to manage data interactions in your React applications. By mastering this concept, you'll create more dynamic and performant web experiences for your users.